Posted by dravon in LiveJournal, Project Review | 14 Comments
Embroidered Collar Renaissance German Shirt – Project Review

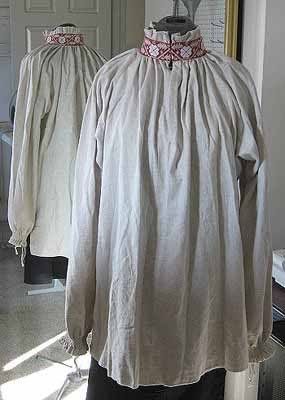
This shirt is made of an undyed (or “natural dyed”) cotton of a deliberately low-quality so that it looks like a working shirt. I didn’t learn until loooooong after the material was purchased and not too much longer after the final touches were put on the garment that cotton had to be imported from India and in the early 1500s was very rare, and as such was DEFINITELY not used to make working shirts. heh. Live and learn. Suddenly I dislike every shirt I’ve ever made for Miles. Need to rectify this.
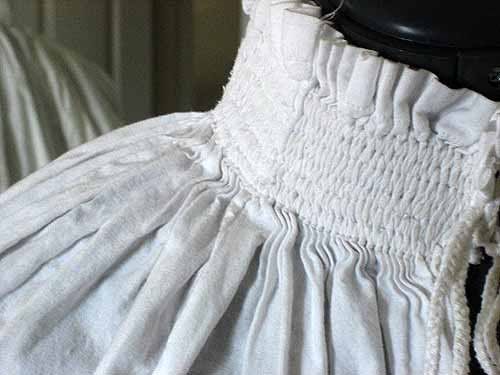
I’ve been working to refine this pattern, and this is about the 5th or so shirt I’ve made with it. I learned from the sewing class I’m in that the technique being used in the collar and cuffs to achieve a mock-pleated look is called shirring, but since I’m using cord rather than elastic thread which I then pull to get the very tight gathers done, it’s called corded shirring. Nifty! And, the kicker, is period. yay! The original versions of this pattern used rectangles, but the arms really did not hang right to achieve the look on the shoulders that I was trying to get, so I modified the pattern to ragland sleeves. I was cringing a bit at this because I was sure it wasn’t period, but I did learn in the History of Fashion Design class that this is exactly the era in which ragland sleeve construction came about and was in use. *whoot!*
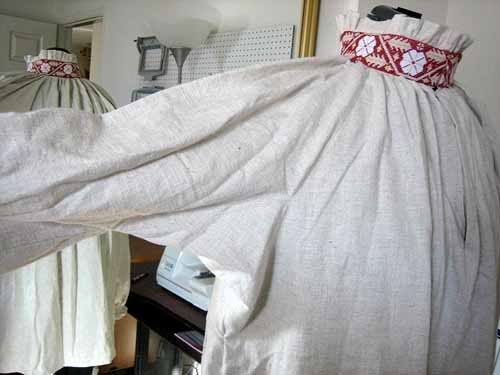
The shirt does incorporate a gore (which I’m attempting to illustrate in the picture), but Miles keeps blowing it out, particularly on the right side which is his sword arm. Making the gore simply larger doesn’t seem to help. When I wear the shirt, it feels like the angle for the ragland sleeve is off, but I’m not sure yet how to rectify this. That actually may have more to do with blowing out the gore than anything else. Mulling this over while I was putting the next shirt together it just hit me to try cutting the gore on the bias while the rest of the shirt was on the grain. Until the classes I’ve started taking, I always thought ‘the bias’ was another name for the selvage edge. Oops! I’m sooooooo glad I’m taking these classes – I’m unlearning all the bad stuff I’ve attempted to figure out on my own over the years, and instead learning all the good stuff which actually stands a chance of working. hehehe. I haven’t experimented with this idea yet to see if it works, but I will be.
The hardest part of this pattern is getting the gathers to look right. I think I’ve finally figured out that this style looks best on thin material. Thin material can literally pack together into the collar, leaving lovely long but tiny folds falling down all the rest of the top length of the shirt, while this heavier material just makes the gathered collar and cuff really fat and clonky without giving me the gentle folds that I’m looking for. The early shirts made were done using a lightweight cotton or muslin, but the folds worked out perfectly. None of the other shirts look as good from this respect. Below is one of the early prototypes done in the very lightweight cotton. Even though the shirt pictured is 2 years old, you can see how nicely those tight gathers cause the material to fall in the manner it was designed to. The mirror shows the back of the shirt, where the folds follow through all the way down.
In the last shirt I made (not pictured) I tried adjusting the pattern so that I could get the collar pulled tight enough to fit the guy it was being made for. As the pattern stood, I had a really hard time packing the shirt material tight enough to get the collar down to Miles’ 17″ neck, so there was no WAY I was going to smash another inch out of it. Unfortunately, my pack test didn’t work as well as it could have, and so the resulting shirt collar is no where near as tightly packed as it should have been. *sad face* I’ll really have to work out this aspect of the pattern — adjustable enough to handle different material types as well as different neck sizes. So far, this is the major downfall of this pattern — sizing. Once this is worked out and I’m happy with it, I’m considering selling the pattern. We’ll see.
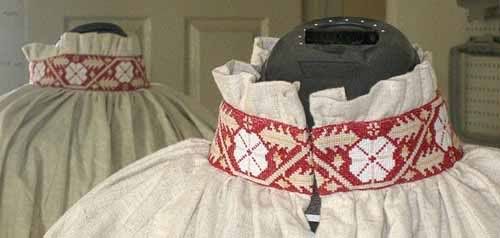
Ah the collar. I was in the middle of this shirt when I got the embroidery software that went with my machine. Naturally, I wanted to try it out. Screw the fact this was supposed to be a work shirt, it was now a blank canvas upon which I could play. After some searching on the net, I found an extant example of a 13th century German Chausable. The image was on a SCAdian embroiderer’s site which is long since forgotten, but she’d included her chart of the oak-and-vine border on the garment. The original, I learned later, employed a technique commonly called Assissi work, in which the background was filled while the central motif was left blank. The SCAdian (a thousand apologies for failing to remember where the heck I found this!!!) had charted the design using modern ideas of color — it employed something like 5 different colors. Taking the original chausable image into my software, I digitized it using the cross-stitch aspect of the program and set about embroidering it. It worked PERFECTLY! I had to learn which threads (40 weight cotton) to use and which sizing to use, but the end result was GORGEOUS!!! At first, I agreed with the suggested color pallet, but after holding it up to the shirt and stepping back, I decided that it had too many colors, and so I went back to the drawing board to return the design to the look of Assissi work, using mostly the same colors that the original design employed. As you can see, I chose to go with white flowers (which I regret now), did the leaves/vines/acorns in the same color as the shirt so that it looks like void work, and did a slightly darker shade for the stems of the leaves so that there was some element of differentiation. After getting the sizing right, I had to rip apart the shirt, cut away the heavily gathered collar and insert this embroidery in its place. I just wish I’d matched up the collar front so that the design was correct, but I get impatient to get started on something and don’t think it through completely. Next time….
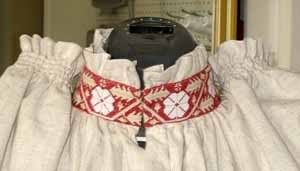
This treatment even further degraded the look of pleated fabric folds, which is a bummer, but since it’s a work shirt I’m not sweating that one. In addition, the original attempt left all the edging still in the top of the collar. The end effect was less than ideal because the weight of the edging bowed out the body of the collar and it looked like the wearer had gout or something. I had to rip it apart again, removed about 1/4 to 1/3 of the top frill and reassembled after using some stiffeners on the back of the embroidery to make sure the collor stood up nicely. Finally, it looked at least acceptable. I do have enough embroidery to do the cuffs as well, but I decided to leave this alone and instead just finished up the collar by adding 3 hook-n-eyes as a closure.
There were 2 things that concerned me about the piece — I used an embroidery pattern from the 1200s on a shirt from the early 1500s (talk about retro!), and I used a very deeply embroidered collar when everything else I’d seen didn’t fit this look.
Both problems were solved by later research. I found a verison of the oak-and-leaves pattern from the 1600s which looked very similar to this, and even found modern versions of this motif that employ the exact same elements. Apparently, the oak-and-leaves as a motif has been in use for at least 800 years! While the blocky elements of this version are definitely a bit early, the design itself is still perfectly period. YAY!!! Assissi work (aka void work) is also something else that was perfectly period, even though the name implies an association with Italy, the original image from which I copied this version was German, predating the association with Italy.
The other problem evaporated when I ran into this 1526 portrait of Hans Melber, credited to Lucas Cranach the Elder.

The Cranach painting collar uses the same sort of red and similar shirt design. While this shirt appears to have the clasps in the back, so that the problem I have with the front doesn’t exist, there are plenty of examples of front closures in portraiture of this era … they are either ties or buttons, and not hook-n-eyes. *frown* Though the design here is decidely more in-line with the tastes of the period (duh) than the one I did is, I can’t quibble too much. But then again, I didn’t design the collar to look like it came from 1526, I did this embroidery to see if I could digitize a period pattern and get it to come out right, saw the naked shirt and decided it needed to be spiffed up. The fact that this portrait corroborates that the idea is a period one, it was more of a fortunate accident than anything else. As an experiment, I’d say the shirt is a success. Now if it’s destroyed, I don’t care.
I’ve been working to collect portraits with good examples of embroidery as well as looking for extant examples. Thanks to this shirt, now that the concept is proven, I’m slowly working my way down to drawing out these accurate period designs so that I can then digitize them. Then I can start embellishing things according to the prevailing tastes of the time so that garment design and embellishment style at least also match.
Edit (2015): This shirt was made many years ago and the lessons learned were incorporated into the Men’s Renaissance Shirt Pattern developed from all of this. I has been worn hard for a long time and still stands up to the wear. Even the underarm gores remain strong and comfortable!


That’s a very lovely shirt and I just love that embroidery (covet covet:D). I think it fits 16th century very well. Have you found the on-line “modelbuch” (a 16th century embroidery pattern book) yet?
RE: Cotton! There is a persistent SCA myth about it that dates back to the early days when everyone had cotton t-tunics and poly satin dresses 🙂 No, cotton was not a rare fabric in Germany at all, and it was imported from many more places than India, including Turkey and Italy. Cotton comes from the same areas as silk does and they often show up in tandem. While it is most true that any shirt of the period was more likely made of linen, I have period German reference to a shirt of cotton as well as veils and garment lining. There is also the fabric “barchent” (which is fustian in English). It was a very common fabric, being made of a linen weft and cotton warp and manufactured in great quanitity in Augsburg and Ulm. The cotton was imported usually through Italy. It was used for lower class clothing. I think I have a scan of some extant stuff in my “German Thoughts” gallery.
I have a smocking pleater I use to gather fabric for these shirts, but I also do them by hand. I’m quite sure that I have not seen a period example of drawing up pleats over a string, so I would be keen to see that! I use a blue fabric marking pen (the kind that washes off) along with the largest mesh plastic canvas to mark for pleating of any sort. It works like a charm for not just the shirts, but for frills at the tops of shirts and ruffs too. It gives a perfect ruffle!!!
Another idea (and period too) is to put a lining band on the inside of the collar – I just take a strip and fold down the edges and use little stitches to put it in place. I especially like to use it to cover the gathering – it protects it 🙂
Oh yeah, I think I have a hook and eye image on a shirt as well – but these fancy embroidered shirts did belong to the upper classes. The lowest classes were forbidden silk embroidery on their shirts… The best lower class images are by Hans Sebald Beham – a google image search will bring up some of the dancing peasants that have rich costume detail.
Thank you for the fabric education! Most appreciated. 😀 There’s much to know, and I’m not the best researcher on the planet so I tend to rely more on what those I respect say.
I have a pleater, but haven’t bothered yet to figure out how to operate it. Too much else to do, and that’s further down on the “List O’ Things To Do” so I’ll get to it eventually. I have seen the blue dot method, but again, haven’t actually tried it yet. Glad to know it works well though! 😀
I do have the modelbuch, I think, but the one I have is intended for weavers – though the patterns can certainly be embroidered rather than woven. Is that one you’re referencing?
This is the one I was talking about:
Egenolf, Christian. Modelbuch aller art Nehewercks und Stickens, George Gilbers, 1880, 75 pages. Note: Reprint of 1527 book. Posted June 27, 2004. CD (HWDA10). SAMPLE PAGE. File size 4 MB PDF
available here:
http://www.cs.arizona.edu/patterns/weaving/topic_embroidery.html
The title page specifically mentions that they are for embroidery and other artistic pursuits.
There are more links to other later ones here:
http://medieval.webcon.net.au/period_16th_c_modelbuchs.html
Oh that’s not the one I have. Thanks!!!
… I think I can get lost in these links… *falls in*
Give a yell out if you need a life preserver 🙂
Don’t miss too the home page and all the nifty links to extant stuff on the australian site. Those embroiders from Lochac have their act together:
http://medieval.webcon.net.au/index.html
Sooo…how many home made goodies and gifts would it take to lure KB down to SoCal for some workshops? Inquiring minds want to know…
http://fahnlein.com/forums/forums/thread-view.asp?tid=73&posts=212&start=1
Fully 2/3rds of the material I have posted in here is directly from Katherine (with credits!). All of her TH translation and fabric references are there and I *highly* recommend cracking away some time ‘post wedding’ to look into them.
I know that most of my best information comes from reading her work.
(Big Ups to KB!)
Could I suggest checking out Rainhilt’s website on embroidery over pleats? http://www.pleatworkembroidery.com/
As for the material weights: Most of the references for the fancy-schmancy pleated and collars shirts I have seen are on rich guys – not poor folk. Perhaps their budgets allowed for a finer material that gives you the final pleating you are looking for? On the other hand, I know Electra has had plenty of luck with medium weight linens. She simply washes them and then hang dries them to ‘set the pleats’ once the embroider/collar is all done.
Thanks for the link! *bookmarks it*
Miles is in an interesting position. His character is supposedly lesser nobility and now poor(land having been confiscated for various political reasons) but his wife is richer merchant class with aspirations for upping their station. Heh. Poor guy, he gets to deal with whatever I’m in the mood to make him. *L* He likes Chris’ take on the common man, but I’m like “no! I can’t do the nifty things I want to learn if you go the common man route! *forbids*”. *chuckles* Instead, I try to compromise, but it’s not generally purely historically accurate re class lines or method of manufacture, but I’ll do the best I can and learn more with every botched project attempt.
i>He likes Chris’ take on the common man, but I’m like “no! I can’t do the nifty things I want to learn if you go the common man route! *forbids*”..
You so funny!
I have some ‘fancy schmancy’ gear that I am working up to for Chris – but trust me, working out how to do a stripped *and* slashed set of pants and doublet where the lines all match up and the lining shows (but the seams don’t) is a plenty big challenge in ‘little ol wool’. *chuckle* Add in all the detail bits and a ‘simple set of garb’ can be quite a task!
And now for something completely unrelated.
My Clotilde order just arrived, you know with the Perfect Pleater? They sent me 2 of the mega-big ones. You want the extra one?
My skills aren’t to that point where I can take on that kind of challenge yet, but I can learn the other pretties. heh. Miles says he’s really looking forward to some of the classes I’ve got coming up because he’s all for little ol wool outfits that are relatively speaking unadorned but fit perfectly. *L* Well, he can dream anyway.
I like your write up on the shirt. The link to pleatworkembroidery that hsifeng gave is one I’ve often read, since German and English styles cross over in the early-mid Tudor period.
I was wondering where you got your shirt pattern information? Is it from an extant garment, or something you’ve worked on from images?
And the linens used back then were very fine, and can pleat up rather tightly. It is difficult to find such fine linens today, but possible. Another friend sent me a few yards of one of the finest modern linens I’ve ever seen, and I am holding onto it to make something very special, as it is rather sheer and fine, and hard to believe it is linen (but it has passed a burn test according to my friend – I still need to test it myself). It is finer than cotton muslin, more like a soft organdy or similar. I am thinking of making a pleated shirt like this for myself, but only after I’ve made a pattern a few times to find the right fit for me.
Thanks again for sharing your work.
pattern for the shirt
It’s a pattern I’m developing based on multiple images with shirts featuring the same top-line that this one has, so it’s not a solitary image I can reference you to. Because I’m doing these shirts for intro-character purchase rather than for special occasion, I’m shirring the collars rather than meticulously pleating them. I was surprised to find a garment in that “History In Detail” book which the authors described as gathered where I’d swear up and down it was pleated, so a case *could* be a made that for the lower-end customer shirts were gathered at the collar. At least, that’s my take. *chuckles* That’s the problem/advantage of trying to interpret images – everyone sees something a bit differently. Anyway, eventually, I might actually pleat one of these shirts but for now shirring gives me the look I’m going for and many of the images, particularly woodcuts, have a remarkably similar look.
The pattern is still in flux, and needs more refining before I feel comfortable sharing it. Maybe by next year… I’m taking some pattern drafting classes this summer and next fall, so I’m really hoping that knowledge will help because right now I’m totally winging it.