Posted by dravon in Education & Instruction | 1 Comment
On Twin Needles – Machine Considerations

I was teaching a class the other day and mentioned twin needles. One of the students made a comment that her machine could only handle one needle. We launched into a fun discussion on exactly what twin needles were, how the use them safely, and how they could be used in our sewing. That discussion and the sample board additions which followed it are the inspiration for this post. Twin needles can be used on pretty much every single home sewing machine. Why? Because while there are two individual needle points and eyes, there is only one shank. The image below shows exactly what I’m talking about here. This single shank means that any sewing machine which can use a single needle can also use one of these twin needles! *ching*  Notice that there are a variety of different needles shown, and you’ll notice that the gap between the needle points is different. You can get twin needles which are spaced apart by 1.6 mm, 2.0 mm, 3.0 mm, 4.0 mm, 5.0 mm, and 6.0 mm. Why the different sizes? Different uses! I’ll do different posts on the decorative and utilitarian uses of twin needles, but first I wanted to make sure that they were being used safely.
“What do you mean by this? Don’t I just put it on my machine and start stitching?”
If you’re doing a centered straight stitch, yes. That’s pretty much exactly what you do. No worries, no fuss, no muss. But if you want to do anything else, and I mean pretty much ANYthing else, then you have to remember that this needle is wider than a single needle. On all mechanical sewing machines, this means I have to make sure that the needles do not land where they should not. Now I can do some math, where I know the machine stitch width is 5.0 mm maximum and my twin needle is 2.0 mm, so my widest stitch would be …. *breaks out calculator* 5 – 2 is 3.0 mm zig-zig or satin or whatever is the widest I can do. But I’m lazy. I don’t want to do math. I’ll set my machine, then reach up and use the hand wheel on the right side of the machine to slowly walk through a stitch and see where those needles land. If they hit the stitch plate, that’s not good. The setting is too wide, so I’ll narrow it down and try again. 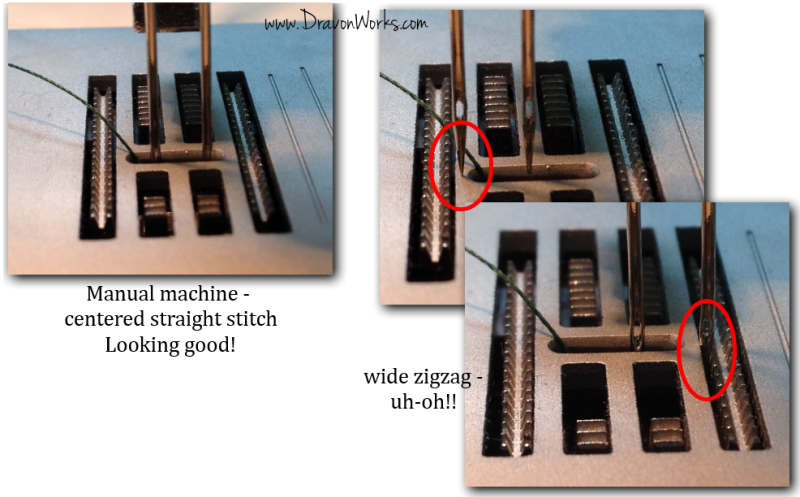 Above, I put a 4.0 mm twin needle onto the simplest sewing machine we have in the store (reminder: I work at The Sewing Café in Pismo Beach, CA). The machine gets the job done, but all mechanical machines mean that I have to be the one with the engaged brain. As long as I’m sewing a centered straight stitch, this machine is happy and I have nothing to worry about. I can tell by looking at the gap where the needle goes that a 4.0 mm is about the widest I can safely use though. In addition to that, the moment I leave a centered straight stitch, I now have to check to make sure the needles will work. In this case, nope! If I had tried to sew a zig-zag with this machine, I’d have some shattered needles on my hands. Shattered needles are no fun! But not all sewing machines are mechanical! Today’s smarter sewing machines mean that I can focus more on the fun and creative side, which is what I’m interested in, rather than double checking everything as I have to with my older machines. That said, not all computerized machines are made equal! The below picture is an example of a fairly low-end computerized machine. You’ll notice on the front it does have a very handy, easy to use “double needle” button setting.
 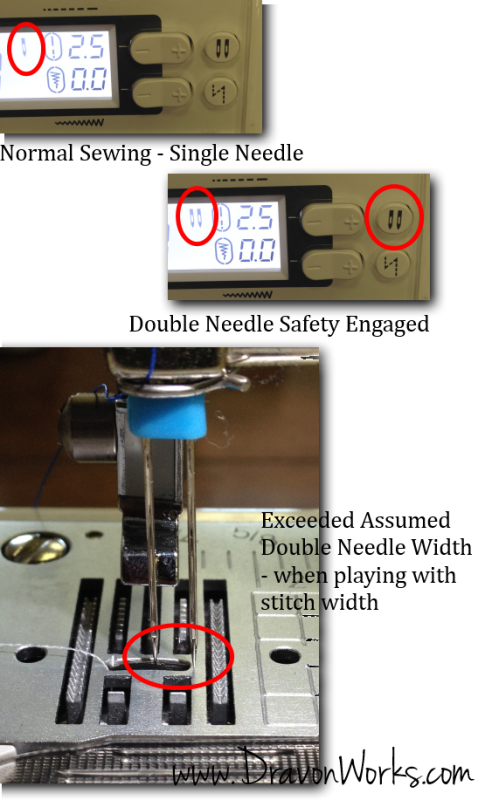 But even this computerized machine can still let me get into trouble. The setting assumes I have a double needle of a set width. The double needle I’m using here is above that width. As a test, I set the machine on zig-zag and upped the width to machine maximum and again used the handwheel to slowly walk through the stitch to test it (or I could do some math again *shudder*). Had I just assumed the setting would protect me and started sewing, you can see above that I’d have a shattered needle lickety-split. That’d be $4 down the drain! Now the higher end machines have the ability to let me set precisely what size twin needle that I’m using.
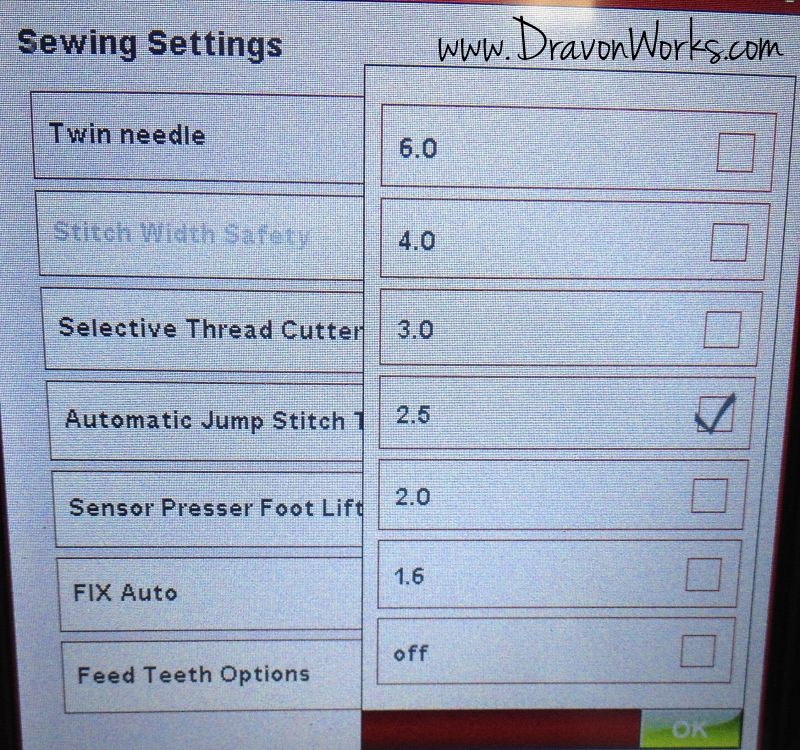
Once I’ve told this machine exactly how big the needle is, then I can play with different stitches and widths and the computer within the machine will calculate everything for me. No math for me!! Because I’m paranoid, I still always do a walk-through with the handwheel, but this machine took care of everything and all settings gave me clearance. Using the different settings and the appropriate needles, I created the below set of samples which now sit on my sample board and I use them to illustrate what a twin needle can do in terms of effects. In the sample, you’ll see that I’ve chosen a center straight stitch, a maximum width zig-zag, and a satin decorative stitch. I did all of these on the machine which does the math for me and ensures I don’t break needles. 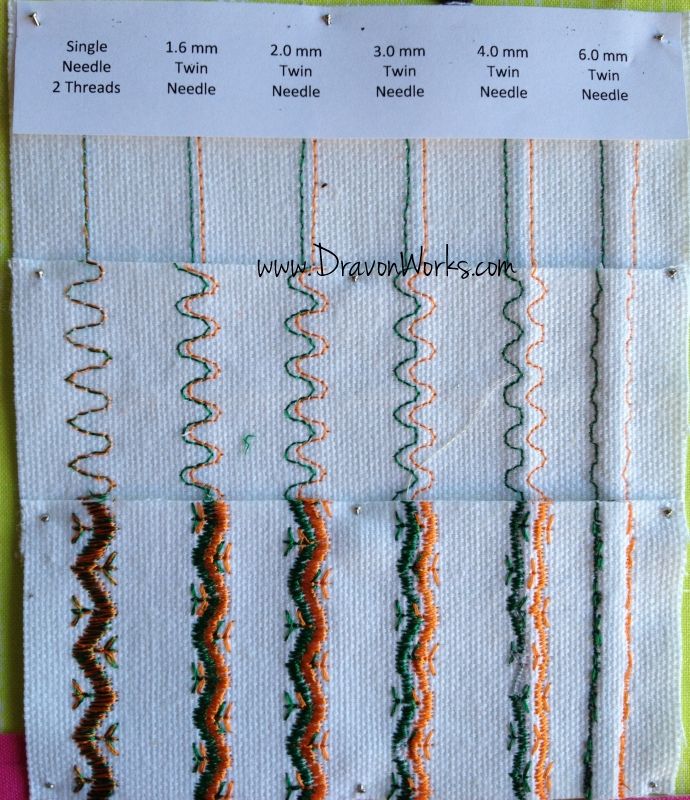 Since my machine was rigged up with two threads, I figured I’d run a sample set with a single needle using both threads through the same eye of the needle. The effect was rather cool! I’ll have to remember that one… But anyway, you can easily see just what happens and the effects that the different widths have.
So that was the start of the discussion of twin needle and machine considerations. I think twin needles have a great deal of creative potential, and I’m starting to use them more and more. I did a set of German Renaissance pants for my husband last week that used twin needles extensively for the slashing reinforcement lines as well as the quilting on it. That worked GREAT! I’m now polling folks who come into the store and who I work with on different ways they have seen or used twin needles. I’ve gotten some really creative and exciting feedback that I’m looking forward to experimenting with so I can share them. I would love to hear how you’ve used twin needles!! Leave a comment to share your experience!
Up next? A post on how to thread your machine for twin needles. After that, a post on the different ways to use twin needles – utilitarian and decorative. Following that one will be a post on different ways to handle the pull that twin needle work has on the fabric (which will be made apparent in the uses post). So stay tuned for more creatively empowering information!
Hope you enjoyed, or at least found the pictures interesting. 😉
Until we meet again, Happy Sewing!
– Dravon


Trackbacks/Pingbacks
- On Twin Needles – Threading the Machine « DravonWorks - […] « On Twin Needles – Machine Considerations […]

Loved it! Learn something new everyday…..now I know why my 4.0 broke….