Posted by dravon in LiveJournal, Project Review | Comments Off on Goldfish corset
Goldfish corset
This is only the 3rd corset I’ve finished to the point of “wearable”. It was made in a class taught at Farthingales of LA, technically this was the 2nd class with them. The first corset class I took used the material provided, and this second one I could provide the material.
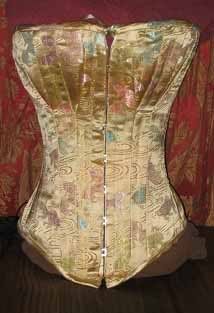
* The material used is Chinese silk (sun yellow background with pastel fishies!) for the facing and the suport fabric is the heavy coutil sold at Farthingales. The coutil is an awesome material, but very heavy. The silk is surprisingly strong but frays HORRIBLY so when I cut any silk in the future pretty much everything needs to be serged as it’s cut, otherwise there are strings everywhere. These 2 pieces (silk+coutil) were serged together so that they acted like a single panel. I can’t remember now what I made the lining out of, but I think it’s a white cotton twill. I think… Unlike the second corset, this lining was assembled and then fitted into place, as opposed to trying to fit it and then sew it. This second method worked MUUUUCH better. Keep doing that.
* For this corset, I used 1/4″ heavy steel bones (the .6mm thick ones, not the .14 thick … er, the more expensive fat ones) at the seams on the front and back while I tried the spiral bones for the sides only. Since these corsets are intended as physical back supports, the combination of the heavy material and the thick bones gives me a very nice “battleship” corset, as they kept calling it. Because of the heaviness of the material, the fact that the actual side bones are flimsy flexible spiral bones doesn’t seem to be a problem to the overall stability and support of the corset. The busk is the typical busk, nothing special. I did use boning tape for this project as well as the twill waist tape, which was only stitched to the corset on the seams so this is as hidden as I can get it.
* The pattern used was the Silverado corset with gore from Laughing Moon Mercantile. The one I made in the first workshop was the Dore corset which comes in the same package. The design was modified so that now there’s a small flap on the front to act as a busk cover. The folks in class, including the teacher, had never seen this before or heard of it, so it was up to me to figure out how to execute it. It worked out perfectly. Basically, I left the front untouched on both sides, but another 2.5″ strip was cut to match the right side. Lining also had to be cut – sew the lining to the outside. … ah, crap. I can’t remember the order in which I put everything together now and I’m just too damn lazy to get up and go get it. It’s not that hard though and I LOVE the look. I hate looking at an otherwise totally spanky corset and seeing these jarring bits of shiny metal sticking out. My busk cover is a baby stomacher. *L*
* I have scoliosis, and even though it’s not entirely a “new” thing I’m always learning new stuff. In this case, I found out that it depends entirely on what time of day the corset is fitted as to how tall it needs to be. The first class, the corset was fitted at night, when gravity has had all day to work on my back and shrink me up. I finished up the first corset and the next morning tried it on to show the man … but it no longer fit. Shockingly for me, it was about an inch or so too short all the way around. DAMN. I shrink a whole freakin’ ass INCH per day!!! *agog* I resolved for the next corset (this one) that I’d fit myself early in the morning, so this one is really long. In talking to the teacher, we decided that the best thing to do (while wearing the muslin mockup and the paper pattern cut out) that I should just add 1″ to the top of the pattern and then proceed with cutting out the material. That might have worked in the Dore corset, but this one has built-in boob cups. Now it looks like my boobs start at the bottom of my rib cage. *sigh* This means that when I’m working on a corset with gores, do NOT add height to the top of the garment — add it where it’s supposed to be added, at the waist.
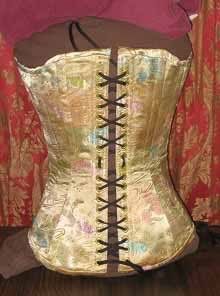
* The grommets are 3/4″ apart (or 1/2″ … I can’t remember now). I learned that the closer the grommets are, the more stable the corset is so I wanted those puppies really close. Unfortunately, this necessitates lacing a friggin’ mile long, which I don’t happen to have. The lacing shown here is from another corset. Eventually, this lacing will be a pale green in color.
* I need to make a modesty panel for this thing. Never done that one before… can’t be that hard though. *crosses fingers* At least I have enough material left.

