Posted by dravon in Education & Instruction | Comments Off on On Twin Needles – Utilitarian Uses In Sewing
On Twin Needles – Utilitarian Uses In Sewing

I’ve talked about the machine conderations when sewing with twin needles, and I’ve gone through a detailed lesson on how to thread most sewing machines to use the twin needle. Now that all of that has been covered, what the heck can twin needles be used for? Well, as with most sewing there are two main uses: functional or utilitarian, and decorative. I’ll leave the decorative stuff for later though.
While I’m sure there are more (leave a comment if you know of one!), the most ways that I’ve used twin needles while sewing include: creating hems, attaching patch pockets, flat-felled seams, reinforcement, and putting down narrow ribbon or twill tape. But it’s rather boring to just answer the question without some pretty pictures to accompany! Besides, taking all these pictures is partly why this post has been so long in the labor room.
Below is a picture of the widest twin-needle which I used on the flat-felled seam of a horse caparison. The inset picture is the garment in action, modeled by Tedi Tate on her TB Stryder. That caparison pattern and instructions is available here for free (link to follow, if I don’t link it please post a comment asking for it). Twin needles make finishing up flat-felled seams a piece of cake! Other comment places you’ll find this sort of seam include along the shoulder and armscye seams of button-down dress shirts and the outer seam of jeans. I could stitch the seam twice, trying to keep the stitch lines perfectly aligned, but … meh. Too much work. Remember. *points at self* Lazy sewer here. I want the best result for the least effort!! Especially for longer seams. Easier and faster to switch out the needle, throw on a second thread and voila! Easy. Perfect.

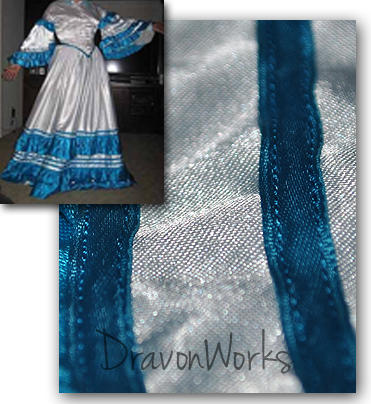
Ever tried to sew on ribbon for some decorative effect? I guess this could fall into the decorative uses category, but after attaching so many rows of that tiny 1/4″ wide satin ribbon, it really feels like a functional use at this point. Below is a picture of the garment I made using this method, an 1860s gown. The tiny ribbon was added to the sleeves just over the flouncing, and a wider ribbon was added all over the skirt as well. Notice that the ribbons are different widths, so I had to use 2 different widths of twin-needles on these.
Slashing garments for visual effect is not particularly common these days, but I do a lot of 16th Century German Renaissance clothing and slashing is definitely the order of the day. I use the narrowest 1.6 mm twin-needles to stitch down the layers of a garment which will serve as not only the line of demarcation between one row and another but serves to reinforce the clothes and help prevent the slash from going farther than I want it to. The double stitching means the garment is protected above and below, so any strain on the slashing has to get through two rows of stitching. Very nice!

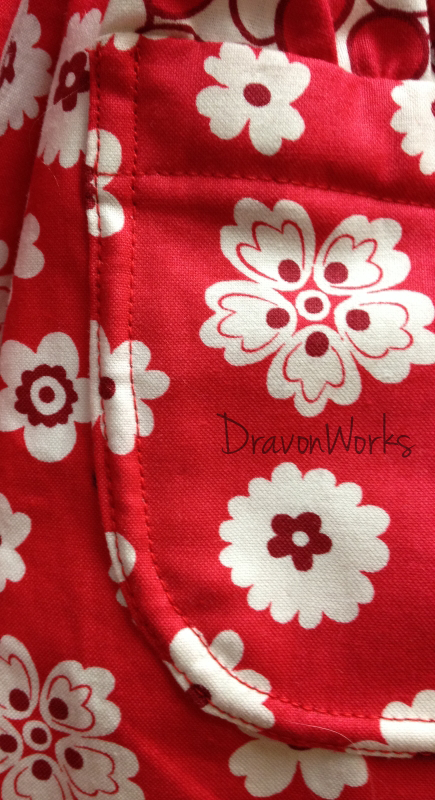
Another great place to use twin needles is attaching patch pockets. Go take a look at your butt. No, really. Go to the mirror, turn around and take a look at those pockets sewn onto your jeans butt. See the double line of stitching holding those pockets on? Yeah. That’s what I’m talking about here. In the picture below I’ve used a standard 3.0 mm wide double needle to stitch down the pockets of this apron.
Do you notice between the two lines of stitching that the material is slightly raised? *straight face* I totally meant to do that. The reason the fabric pulled in is because while there are two different threads on top, there is still only one bobbin thread being used. That means that during the creation of this stitch the single bobbin thread must catch both of the top threads. On the backside, you’ll see the bobbin thread bouncing back and forth between these two top threads in a zig-zag motion.
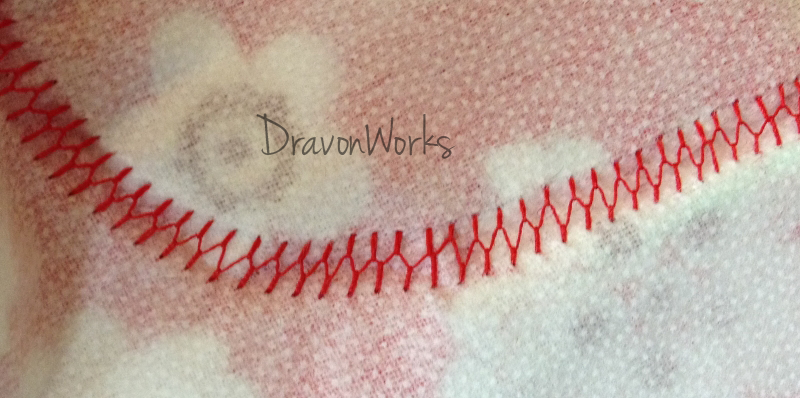
That side to side pull coming from the bobbin thread means I could be dealing with a raised area between my two lines of thread. You don’t see that effect in the flat-felled picture because that material was so heavy it just laughed at the tension on the stitch. The ribbon was narrow, and the reenforced lines were even narrower so any pull is miniscule. But for the red apron, even though I was using a lightweight stabilizer the light weight material and the wide stitch lines were not enough to combat the pull exterted by this stitch. Lowering the tension on my machine is one possible solution, but so is adding more stabilizer. I’ve got a whole section of my sample board dedicated to stabilizer and the effect on your end result, so stay tuned for that post. Until then, just know that if you see your fabric being pulled or puckering as you sew, it’s because the fabric isn’t being stabilized enough for the stitch being used. I’ll be doing a post on this at some point, so stay tuned for Stabilize Those Stitches!
But this is a nice segway in the final, most common use for twin-needle — hemming, especially on knits. Knits require a stitch which has some stretch in it. A straight stitch will simply break if you don’t stretch the material as you sew, but using a twin needle gives you the look of straight stitches, but the zig-zag on the underside means that the stitching has some flexibility to it. I call this my faux cover-stitch. What a coverstitch? It’s a type of stitch only available on the high-end sergers — but you can cheat and use twin-needle straight stitching on a regular sewing machine to do the same job!! The only thing is that the bobbin thread isn’t quite as good at covering and containing the turned under raw edge as an actual genuine cover-stitch is, but *switching to Shrek voice* it’ll do, Donkey. It’ll do.
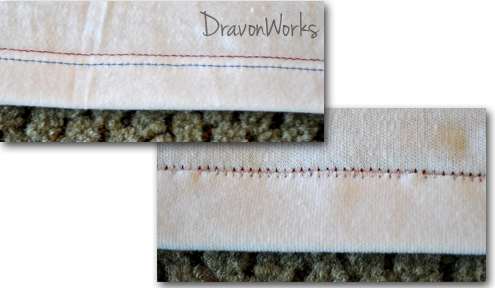
If you look along the edges of pretty much any t-shirt and you’ll see a double row of stitches which look just like what is pictured above, but if you turn it over you’ll see the double threads intertwining through the double straight stitch. That’s a true cover-stitch, because it covers the raw edges of turned under material. The underside of this stitch, with all those extra seeming threads, is why coverstitch is so great for knits like your t-shirts — even though it looks like a straight stitch, the stitch can stretch with the material because the underside is what is flexing and stretching.
PHEW!!! Finally. This baby has been born. I’m tired now. *lol* Seriously though, in the comments section below tell me how you’ve used twin-needles. Also, if you liked this post, the pictures or learned anything at all, be sure to Like the page and it’d be super awesome if you’d Share it with your friends! Follow me on Facebook or Google+ to be notified when new posts are published or new events are scheduled.
Until we meet again, Happy Sewing!
– Dravon


