Posted by dravon in LiveJournal, Project Review | 51 Comments
SFVQA Quilt Block of the Month for June/July 2011
In May, I attended my first ever meeting of the San Fernando Valley Quilt Association (SFVQA). I decided to join because I was hoping that being in contact with creative, driven people would continue to feed my own creativity as well as inspire me. I had no idea how very huge this club is. Having been to a few sewing related groups, I was expecting a handful of blue hairs. Boy was I in for a shock! There were easily 200 people there, even a few men! Heck, the president of the club is a man.
Despite not being big into quilting and definitely not really interested in piecing, I figured I’d give the block of the month a go. I made one and it turned out so horribly that I literally cried. It was a huge blow to my ego for some reason. I had this idea that I could just follow the directions (of which there weren’t really any, just “cut X of this and assemble to look like the picture”) and end up with perfection. *chuckles* Unrealistic expectations. For sure.
Figuring that this was a skill it might stand me in good stead to be better at, I went to the Quilt Emporium and took their “My First Quilt” class. I learned a LOT, including how to place items precisely together to get a perfect point (that project is almost finished and will have a post mortem of its own). Man, that IMMEDIATELY translated into a perfectly placed zipper on a skirt I was working on. Holy crap! Suddenly I’m seeing how piecing and quilting can help me improve my clothing skills, not to mention broaden the design ideas.
Anyway, here’s the first attempt:
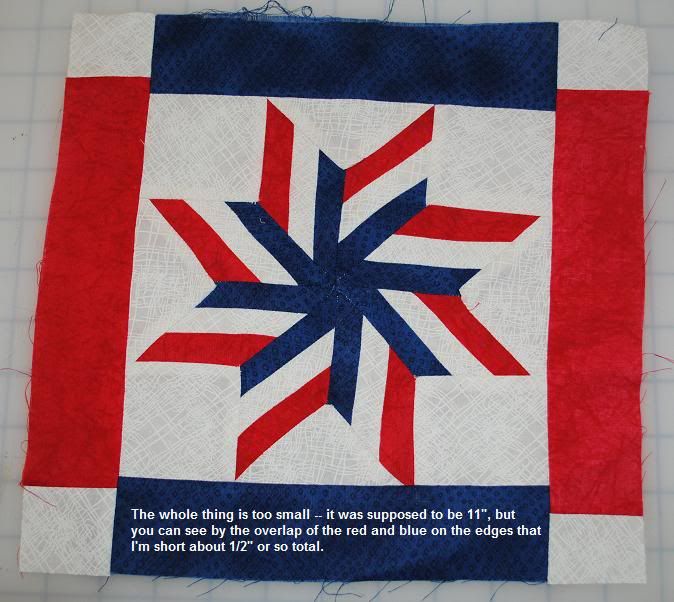
I showed it to the ladies at Quilt Emporium and their eyes bugged out. “That’s your FIRST block? That’s an extremely advanced design…” Well, at least I felt better about the final result at that point. Anyway, you can easily and immediatly see the biggest problem — the center of the block is too small, causing the blue and red borders to overlap. Even with the other flaws, had this block not been the required size I could have used it. As is, now it’s just pretty trash.
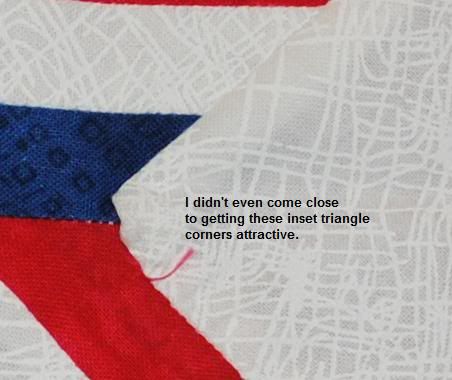
The second aspect that had me ripping out my hair were those inset triangles. I learned that lingo at QE. I was doing research on half triangles, and not finding a darn thing to help me. Having the right terms for things would really help. You can’t really see it very well in the picture, but the corners are sloppy. Heck, I couldn’t even get the stitches close enough to fully tack it down. Guess I need to practice my welt pockets more!
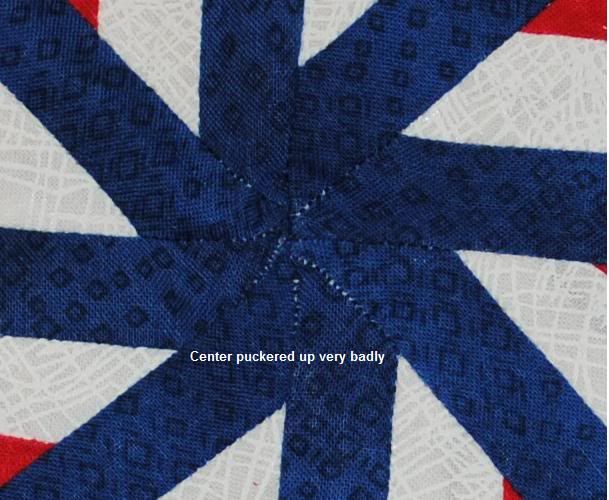
The final problem, and definitely the most minor one, is that the center bulged up and looked ugly. I assemble this one from the center out, putting the star pieces together first, then attempting to put in the triangles and squares and lastly the border. That didn’t work out so well. Using the information learned in the class, I approached the second attempt at this block very differently.
Here is the second attempt, the one that I’ll be contributing to the Block Party.
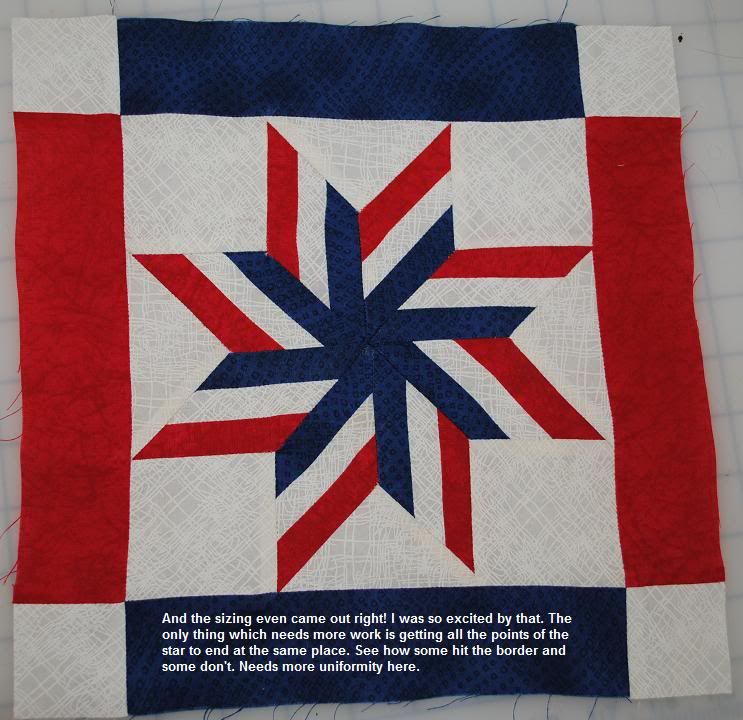
It’s still not perfect, but it’s much improved. *phew*
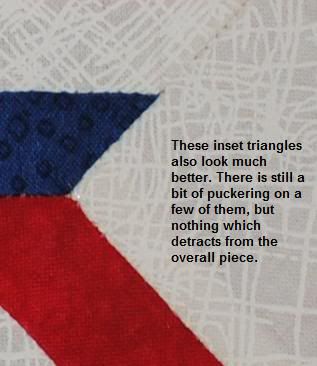
I am MUCH happier with the inset triangles. They still aren’t perfect, but at least they are nice and crisp now. This block was assembled by attaching the star point to the inset triangle, giving me 4 inset triangle pieces. Then I did the star point abbutting the square. Then I put the triangle and the square pieces together.
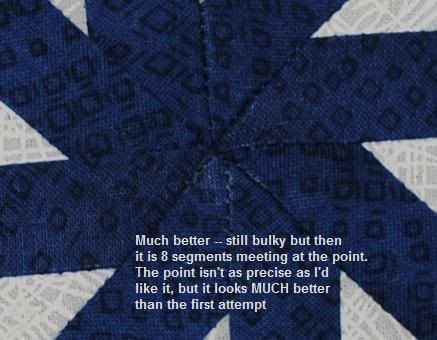
In essence, I put the star together in segments so that by the time the 4 quadrants were put together all I had to do was sew a straight line down the center of the star and viola, much better center with very little pucker.
And that is the block pattern from this month. I must admit, it has surprised me how much I learned by taking up this challenge, and how much my normal sewing will be improved. I have 2 ifferent quilts and one quilted vest, all historically based, which is what is driving this particular quest. Besides, I’ve been awed and amazed and totally inspired by the vast amount of creativity that the folks at the SVFQA bring with them. It’s definitely a lot more than just the standard pieced quilt tops. 😀


As is, now it’s just pretty trash.
Don’t you dare throw that out! That would be a perfect oven mitt with some lining, some backing and a bias tape loop for hanging!
😉
Good idea! It’s still ugly though. It also very clearly illustrates that I need to invest in a walking foot so that I can stitch through all the layers without causing puckering. Well, that and I need more practice with bias tape…
Decided to use a satin stitch on the bias tape edging. Never used satin stitching before, so I figured this would be good practice. Took a while to get the hang of it, and I’m thinking the walking foot would have helped with this too. The many layers of fabric were too difficult for the feed dogs to pull through on their own, so I had to help a bit and ended up pulling too much at the beginning, causing the satin stitch to not be very satiny.
Thanks for the idea! Just in time for the 4th too. heee
Woo hoo! 😉
Woo hoo! 😉
Woo hoo! 😉
Woo hoo! 😉
Woo hoo! 😉
Woo hoo! 😉
Woo hoo! 😉
Woo hoo! 😉
Woo hoo! 😉
Woo hoo! 😉
Woo hoo! 😉
Woo hoo! 😉
Woo hoo! 😉
Woo hoo! 😉
Woo hoo! 😉
Woo hoo! 😉
Woo hoo! 😉
Woo hoo! 😉
Woo hoo! 😉
Good idea! It’s still ugly though. It also very clearly illustrates that I need to invest in a walking foot so that I can stitch through all the layers without causing puckering. Well, that and I need more practice with bias tape…
Decided to use a satin stitch on the bias tape edging. Never used satin stitching before, so I figured this would be good practice. Took a while to get the hang of it, and I’m thinking the walking foot would have helped with this too. The many layers of fabric were too difficult for the feed dogs to pull through on their own, so I had to help a bit and ended up pulling too much at the beginning, causing the satin stitch to not be very satiny.
Thanks for the idea! Just in time for the 4th too. heee
As is, now it’s just pretty trash.
Don’t you dare throw that out! That would be a perfect oven mitt with some lining, some backing and a bias tape loop for hanging!
😉
As is, now it’s just pretty trash.
Don’t you dare throw that out! That would be a perfect oven mitt with some lining, some backing and a bias tape loop for hanging!
😉
As is, now it’s just pretty trash.
Don’t you dare throw that out! That would be a perfect oven mitt with some lining, some backing and a bias tape loop for hanging!
😉
As is, now it’s just pretty trash.
Don’t you dare throw that out! That would be a perfect oven mitt with some lining, some backing and a bias tape loop for hanging!
😉
As is, now it’s just pretty trash.
Don’t you dare throw that out! That would be a perfect oven mitt with some lining, some backing and a bias tape loop for hanging!
😉
As is, now it’s just pretty trash.
Don’t you dare throw that out! That would be a perfect oven mitt with some lining, some backing and a bias tape loop for hanging!
😉
As is, now it’s just pretty trash.
Don’t you dare throw that out! That would be a perfect oven mitt with some lining, some backing and a bias tape loop for hanging!
😉
As is, now it’s just pretty trash.
Don’t you dare throw that out! That would be a perfect oven mitt with some lining, some backing and a bias tape loop for hanging!
😉
As is, now it’s just pretty trash.
Don’t you dare throw that out! That would be a perfect oven mitt with some lining, some backing and a bias tape loop for hanging!
😉
As is, now it’s just pretty trash.
Don’t you dare throw that out! That would be a perfect oven mitt with some lining, some backing and a bias tape loop for hanging!
😉
As is, now it’s just pretty trash.
Don’t you dare throw that out! That would be a perfect oven mitt with some lining, some backing and a bias tape loop for hanging!
😉
As is, now it’s just pretty trash.
Don’t you dare throw that out! That would be a perfect oven mitt with some lining, some backing and a bias tape loop for hanging!
😉
As is, now it’s just pretty trash.
Don’t you dare throw that out! That would be a perfect oven mitt with some lining, some backing and a bias tape loop for hanging!
😉
As is, now it’s just pretty trash.
Don’t you dare throw that out! That would be a perfect oven mitt with some lining, some backing and a bias tape loop for hanging!
😉
As is, now it’s just pretty trash.
Don’t you dare throw that out! That would be a perfect oven mitt with some lining, some backing and a bias tape loop for hanging!
😉
As is, now it’s just pretty trash.
Don’t you dare throw that out! That would be a perfect oven mitt with some lining, some backing and a bias tape loop for hanging!
😉
As is, now it’s just pretty trash.
Don’t you dare throw that out! That would be a perfect oven mitt with some lining, some backing and a bias tape loop for hanging!
😉
As is, now it’s just pretty trash.
Don’t you dare throw that out! That would be a perfect oven mitt with some lining, some backing and a bias tape loop for hanging!
😉