Posted by dravon in LiveJournal, Pipeline Update | 2 Comments
Ruskin Lace Attempt One
Got the camera battery all charged up AND found the cord which lets me transfer images from the camera to the computer. That means, I get to catch up on a loooot of posts…
First up — Ruskin Lace Attempt One
My ultimate goal is something that resembles the 16th century Greek Lace, or Punto Tagliato, or … It’s got lots of names, depending on your source. Ruskin lace is the Victorian revival version of this type of drawn-thread “lace” fore-runner. Because Ruskin lace is still being taught by a wonderful lady in England, I ordered her DVD and churned out that REALLY ugly example. It’s ugly. Ugly I tell you. heh. I was shocked as hell when my instructor, who has a masters level recognition in embroidery and lace making, said it was nicely done and very “clean”. *boggles* Of course, she only saw the early stages so as it got closer to completion it got uglier because the stitches got more difficult. Anyway, this was a learning piece, and it taught me lots. Here goes…
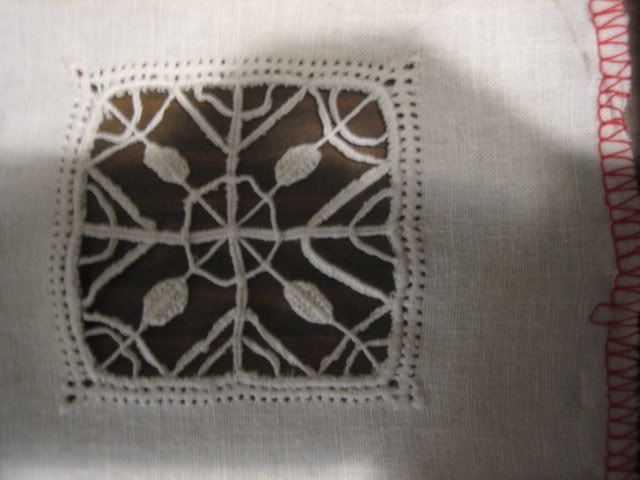
Like its historic forebearer, Ruskin lace is made from a whole clothe which then has selected warp and weft threads cut and removed from the piece. The outter edges, or frame, is the standard hemstitch with 2 sets of 2 drawn threads with 2 threads left between them. See those series of dots all around the outside edge? That’s the hemstitch frame. Now one of the things that Ruskin lace absolutely stresses is the need to use an even-weave material. That is the material as the same warp thread count per square inch as weft thread count. Like cross-stitch material – that Aida material is an example of an even weave clothe. I threw that concept right out the window and learned… you do NOT need an even weave material. ANY material will work but you do need to rely on measurements rather than simply counting the # of threads to remove. In this square, for example, there were about 2 to 2.5 times the weft threads as warp threads, and the weft threads were also much thinner than the warp. That did not, in the end, adversely affect my design. What did the most to poorly affect the end result of my design was the failure to properly anchor the material. This meant a lot of stretching, and so my “straight” lines aren’t, and my “circles” also aren’t.
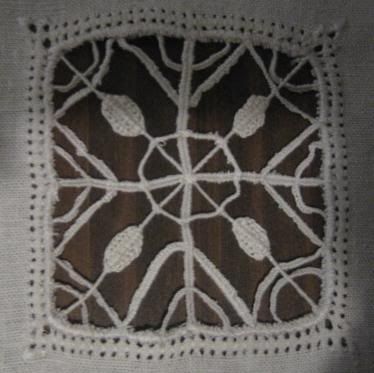
Despite this foundational glaring problem, I think it turned out well. One major lesson learned was to cut the threads in the center BEFORE adding that padded roll. You see the fuzz along the edge of the empty space? That’s a result of cutting those threads after I had secured the roll into which all the ends would go. Oops. Removing those threads just before I wrapped that area would have prevented the fuzzy cheesy look.
Because the threads of the material were so small, I wanted to match the weight of my working thread to the material thread at least somewhat. But damn that was thin thread! I decided to double up my working thread in order to help reduce the number of stitches I’d have to, because I’m LAZY. As I got into the added bars and buttonhole stitches, the result of this practice was the twisting of the thread because the twist of the individual strands were fighting each other. Switching to a single thread immediately solved this problem, so … lesson learned. No cheating! *sigh*
One thing that concerned me when comparing the images of the 16th century cutwork lace with the Ruskin lace was that the Ruskin stitches were painfully obvious, but I learned that’s because the base material all the thread they are using is HUGE in comparison. My own work here shows me that the tinier the thread used, the more those stitches are harder to make out. I was also concerned that the stitches the Victorian recreators used were not the same as the original, but the Ruskin folks actually had in their hands the originals from which to work. Showing the images to another embroiderer who does tatting and other knotwork laces. She looked at the source images and said those were buttonhole stitches, or half of the tatting stitch, which is a buttonhole stitch. heh. In working the bars, I realized they were nothing more than tailor’s tacks, a series of tailor’s tacks. It was nice to be able to identify what was going on. It made it much easier to work with things.
I did a small video because the camera could get more detail than it could with a picture. It’s nothing fancy.
Looking forward to trying this again, applying what I’ve learned. Hopefully, the collar I have in mind will turn out better than this one did.


I think it is lovely, far more complicated than the simple drawn thread piece I have done and much cleaner!
Very intricate, time consuming, and very pretty! I wouldn’t even attempt this, quite an accomplishment!