Posted by dravon in LiveJournal, Project Review | 1 Comment
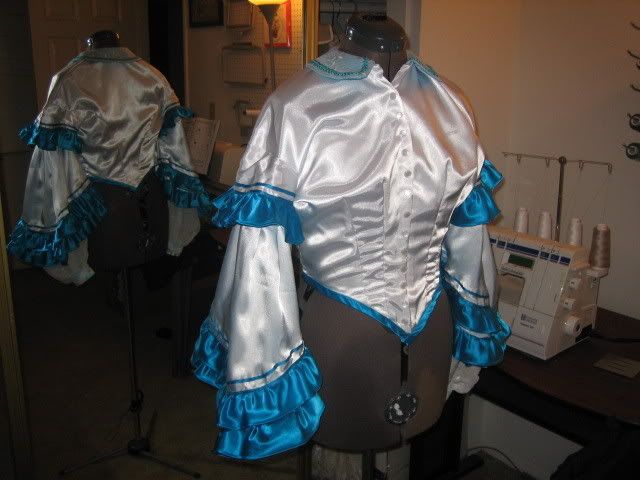
Bodice of the white and turquoise 1850/60’s dress
While the process is still somewhat fresh in my mind, this is the post-mortem for the creation of the bodice only for this dress:

This project was undertaken for a class called Apparel Construction, however I didn’t want to make a giant purple dress. I’ve been collecting images of real dresses from the era as well the many fashion plates of the time, so I turned to this source to inspire me when it came to color. There are several dresses throughout the 1850s and 1860s which feature a white base with turquiose or aqua or teal or green or blue trims. That was a fairly common combination in terms of the prints (I know this doesn’t automatically mean they REALLY did it), but it’s not a combo I’ve seen executed much. I liked the potential dramatic look of it, so I went with white and aqua.
Hitting the fabric district, I found a really nice very lightweight pair of satins — white and pale aqua. The pattern also called for 45 yards of trim for the bell and more but thinner for the sleeves, and then 15 white buttons. Unfortunately, I couldn’t find the same type of trim in 2 different widths that had 45 yards available in the color I wanted… so I got as close as I could. I also found a sheer material with an embroidered floral pattern on it which I used as the undersleeves and on the top of the collar and cuffs. You can see the pattern in the last image pretty clearly.
After showing the colors to the class teacher, he pulled out this AWESOME bright blue/turquiose that he said I could have for free. Because of this, the design was altered. All the trim on the dress (mostly the ruffles on the sleeves and skirt). I wanted to keep the aqua that I purchased within the design, so I altered the look to make the cuffs and the collar and all ‘contrast material’ (mainly inside the bell of the sleeve) to this paler aqua. One other alteration from the sample done pictured on the pattern is the addition of the turquoise trim along the bottom edge of the bodice. Fortunately, the trim I got for the sleeves actually matched this richer color almost to the shade! *shwing* You’d think I planned it… but no. And this is an overview of the end result…
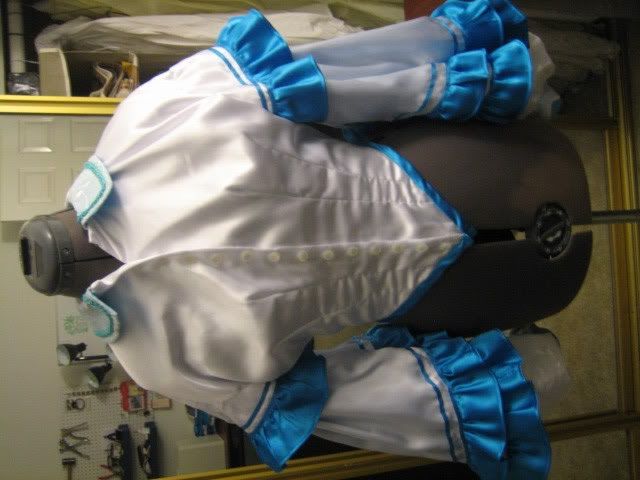
There is no closure right at the neck, so the design actually depends on the wearer having some decorative broach to go here. The collar also has a built-in gap to accomadate this broach. Unfortunately, the manequin’s neck isn’t as small as mind and the chest isn’t as big as mine, so it doesn’t particularly show well in these areas, but it fits very nicely. The buttons are feaux, since they don’t do anything. The front is actually closed by a set of hook and eyes down the front.
When it’s on, even my super square shoulders look like a fashion plate of the era. I was SHOCKED. Miles said the shoulder line was outstanding, but that completely gets lost on the dressform. *le sigh*
Obviously, I got the super slicky shiney satin. Oops. Perhaps I should have continued looking for something a wee bit more matte, but oh well. It doesn’t show up in the pictures I chose to take, but the one area of the bodice that jumps out at me with a club is the center front of the edging. I put the strip right on the edge, but forgot to take into account that when it was folded, it wouldn’t be long enough to actually cover the tip of the point. I had to sew a tiny snippet on the front there and sorta manhandle it with a hammer to get it to work somewhat reasonably. I should have paid attention to that short of thing, but, once again, my lack of attention to details and impatience to get the end ruined an otherwise nice project. *pouts* Fotunately, it’s faily minor in the grand scheme of things but still…
The one part of this bodice which I flat out haven’t done (yet) is the padding that goes into the hollows of the shoulders. You can see on the model dress that the bodice doesn’t divet between the shoulder and the breast (what I’m calling the hollow), but rather forms a straight line. This is accomplished with padding, and I just haven’t done it yet. Not sure if I’m going to. Let me finish the skirt and see the ensemble together before I make this determination. It will be a very easy retro-fit though.
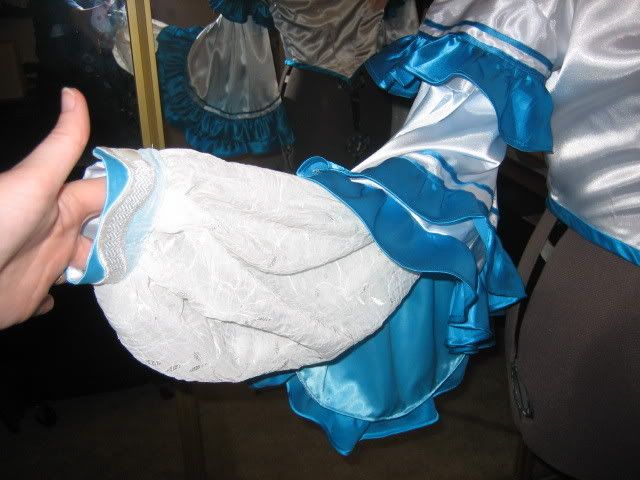
Here is the sleeve. I wanted to get a shot of the gauzy embroidered undersleeve, as well as show how the bells of the sleeves worked. These had to be the most complicated sleeves I ever seen. Forget the ruffling. That’s piddly. This sleeve is compose of 3 separate rings. The first ring is a the top and end in the little ruffle up there. The second ring is the largest part of the sleeve and fits up inside the top ring. They are sewn only at the very top, so these 2 rings can slide over each other as needed. The 3rd ring in the gauzy part, and like the second level it fits up into the first two and attaches only at the very top … with … safety pins? I looked all through these instructions but could find no reference to ever tacking them down with thread. So, for now, these are still held in place by safety pins. *shakes head* Whatev.
You can see the interior of the satin sleeve and also the cuff are both the paler aqua. Why use this on the cuff instead of the darker color? I’d like to pretend that some deep inner wisdom just knew that if I cut semi-circles out of the material for the collar, then I would definitely NOT have enough material left for the ruffles on the bottom of the skirt. Alas, I can claim no such inner wisdom. I did it … because demmit! I bought the friggin’ material. I wanted to use it. And I didn’t want the cuff to just be more white, then it would get lost in both locations. Nor did I want to use the dark color because I didn’t want the shock value at the neck and wrists — I wanted that on the bottom edges of the bodice and sleeves only. So … I used the lighter color and lightened it up even more by adding the sheer material to the top of it. Fortunately, the straight cuffs allowed me to use the actual edge of the material, which had this nifty wave pattern. So now the cuffs are striking, without being shocking or fighting with the other color for eyeball time, but they aren’t boring either.
Where did I screw up here? Oh let me count the ways! On one sleeve, the material is wrong side out. Yup, sewed it ass backwards. *hangs head* Again, failure to notice those pesky details until it’s too late. On the second sleeve … I put the cuff on backwards. While the sewed the material together correctly, putting the cuff on backwards meant I had to use the sleeve inside out … so now it’s gont the material wrong side out with a french seam on the exterior. By this point, considering the exam was in a couple days, I said ‘screw it, you can’t tell’ and went on about the process. True, you can’t really tell. But now that I’ve pointed it all out in it’s disappointment glory, you’ll see only that and the ugly lower point on the bodice should you ever see it in real life.
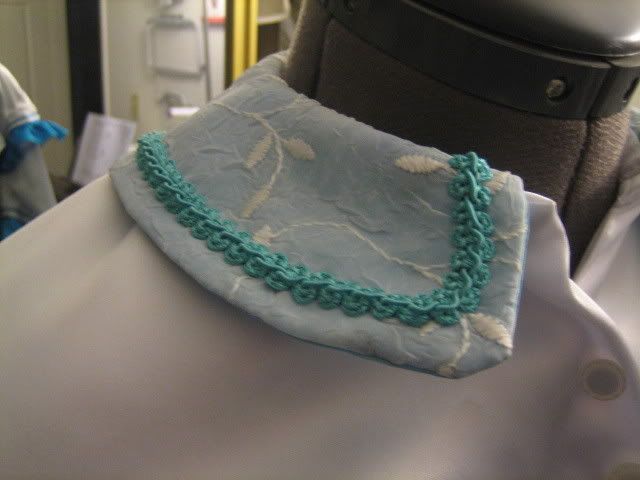
The logic used for the cuff is the same one used for the collar. As luck would have it (no, really), the trim I got for the collar actually worked out. It’s almost like I planned it or something. *snort* I think I managed to put this one together correctly, so there’s no real drama here. It came out nicely.
I can’t recall any real difficulties with sewing the material. It didn’t slide around or anything, though figuring out how to sew the massive ruffling on was a challenge. Since I wasn’t sure how much I had or would neat, I chose to forgo useing the ruffling foot *whimper* to pre-gather the lengths. Next time, I make sure I have a TON of the edging material because damned if I’m going to hand gather 9 yard strips again! Though I was very pleased with how close I was able to get to the trim edging. woohooo! That used to be a serious challenge (the straight line) but I’ve gotten muuuuuuch better at it.
Now I’m working on finishing up the skirt. I’ve removed the band and taken out the temporary pleating used to pass the exam, and will adding in the ruffles along the bottom as well as the trim. You can see on the original demo dress, there are a total of 6 rows of ruffling, with a small gap between rows 3 and 4. I had a heart attack when I discovered I had only enough material to complete 5-1/2 of the 6 rows, and no more of that material available. *cries* I’m thinking the best way to salvage is to do the 5 rows, and just end it short. Will just 2 rows in the second upper tier look okay (on top of the 3 rows in the lower tier), or should I leave it and take the swatch somewhere and pray the Fabric Gods smile on me?


WOW!!!
That is soooo beautiful!!
You’re really talented!