Posted by dravon in LiveJournal, Project Review | 3 Comments
Skirt of the white/turquoise 1850/60’s dress
The bodice for this outfit is discussed here: http://dravon.livejournal.com/351225.html. The skirt was not finished in time for the final exam of the class which saw this outfit started, and so I’ve now finally completed the skirt. YAY! One whole historical outfit is now complete … except for the undergarments. heh. All the pictures in this section are of the skirt without the hooped underskirt, so it looks a bit … deflated. Ah well. I’m just excited to have the skirt complete! I was having fun prancing around the house with the outfit on, so here are the pictures of it – skirt and bodice.
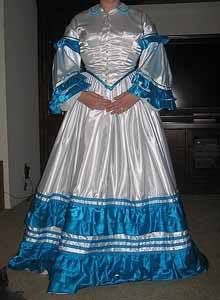
From the front…

From the back…
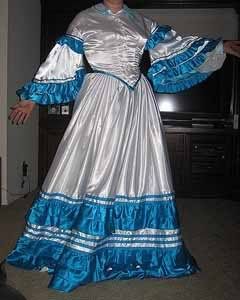
These sleeves make me look like I have wings…
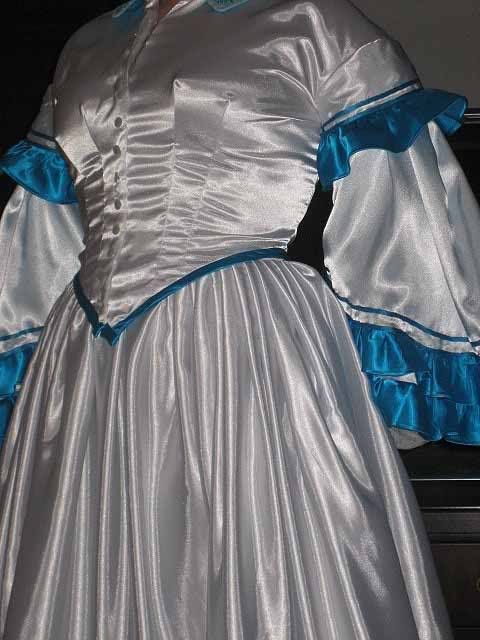
The treatment at the waist, with a contrasting color to help break up the sea of white and also call attention to the waist, doesn’t seem to have been something commonly done. Oh well. This is my first such outfit, and I learned a lot.
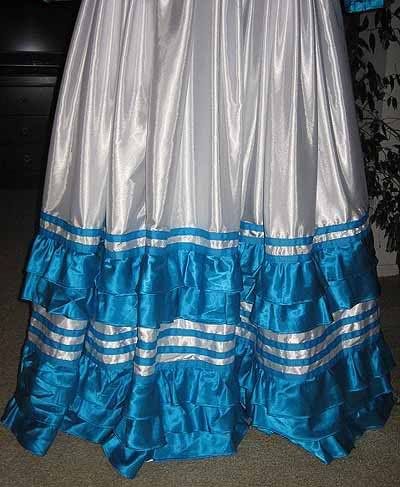
Not sure if anyone remembers but this skirt was originally supposed to have 2 sets of 3 rows of the turquoise flouncing, but I didn’t get enough of the turquoise so only had enough to do 5 rows of the pattern called for 6. Here is how I decided to make up for the lack…
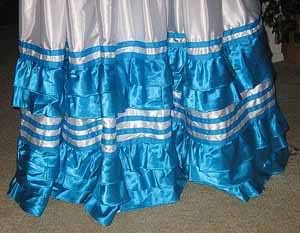
Since the ribbon trim I got was a full inch wide instead of the pattern called for 3/4″ width, I decided to use the full width of the ribbon and simply spaced them out some more. I put 1 row of trim on for every row of flouncing — so there are 3 rows of trim on the bottom and 2 rows on the top. I think it ended up looking pretty good!
What do you think? Works? Doesn’t work?
This skirt was also my first attempt at cartridge pleating. I think it turned out pretty good, and it was a lot easier than I thought it would be!
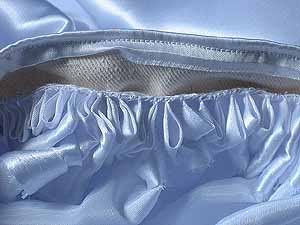
From the inside…
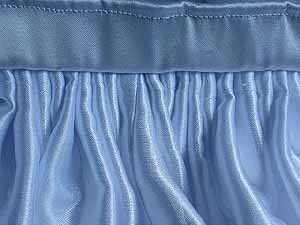
From the outside…
Let’s see. What I learned.
(*) Trimming slick satin with slick satin is not particularly easy. I think I did reasonably well getting the trim lines straight, but it’s not exactly as precision looking as I’d like. I’m afraid that when the skirt has the proper support and actually bells out like it’s supposed to, then the mistakes will be like neon signs saying “amateur!”. *sigh* I think taking the time to use some sort of iron on gum stuff would have really helped, though it will also be time consuming.
(*) Next time I try catridge pleating on this era of skirt, I’m going to bring the knife pleat a little further around the sides and do the cartridge pleating ONLY in the back. On this one, I started at the side seams, so when I put it on, the pleating gives added width to the hips as well as the butt, an effect I didn’t particularly want. Oops.
(*) Always make sure to get enough material to actually make the requisite amount to flouncing layers. Never again will I do the gather method on flouncing, instead I’ll use the ruffling foot that I have but haven’t used. I opted not to use it on this project because I knew there was a question of not having enough, and I did want to end up any more than 1 row short just because the ruffler foot used far more material than expected. So, next time … get a WHOLE lot of material and use the ruffling foot!
(*) My method of attempting to cut bias strips out of large sections of cloth sucks and really needs to be figured out. I ended up having increasingly short sections of material and then having to piece them all together to get strips long enough – and I’m sure this wasteful approach did a lot to contribute to the problem of not having enough stripping for the project.
I think that was about it on the skirt. It was pretty straight forward, but it was a HUGE bell. Wow. That’s a lot of material. And shiney. I think I’ll need sunglasses to look at in the light. heh. And I think the color choice is too “youthful” for me to wear successfully, so that just bolsters my idea of selling it. Not like I’m going to wear it, and I do think it’s relatively poor quality. But it was intended as a learning project, and for that purpose it was a smashing success! I also have to admit, I LOVE those colors! LOVE love love love!


It looks lovely, and I look forward to pics of you in it with the hoops on.
I second the, “Let’s see it with hoops!” action….*grin*
Hoop action! I like it. 🙂