Posted by dravon in LiveJournal, Project Review | 1 Comment
PatternMaking 2 Mid-Term
This semester, I have I believe a total of 3 garments to make in this class. The first one was due today, and even though I still haven’t found the battery charger for my digital camera (which is why I can’t do post-mortems for the Draping 2 projects already done) I was able to get a few overview pictures because the fellow taking the images for the fashion show kindly burned me a copy.
Just for clarification, the PatternMaking class does not allow any sort of draping to test fit or anything. All that is done through manipulation of the flat pattern. The Draping class, however, wants everything draped first, and then a pattern made from that marked up cloth.
We could design anything we wanted, and I wanted something which would:
(1) test my ability to make color-changes between non-attached pieces line up
(2) found a really nifty dress-closure in an 1820s dress that I wanted to see if I could figure out
(3) chance to play with blind-hem
The closure mentioned only works in a top without sleeves. Since I’m tired of dresses and even more tired of the empire-waist (which the original dress was), I opted instead to go with a bustier top and a pair of trousers. For the color-matching, I decided to keep is simple by doing an external stripe down both sides of the entire outfit. My original vision was for the strip to be a brocade and the interior to be a solid color, having seen it, it looks like a strange track suit. At least, the colors I chose were not particularly exemplary! One of the other folks in class suggested a ‘tuxedo’ motif, with a shiny satin strip, matte black for the rest of it with the center front of the bustier being white with black piping on the top. Now THAT would have looked a hell of a lot better!! Oh well. My sense of color is pretty terrible, so this confirms it. heh
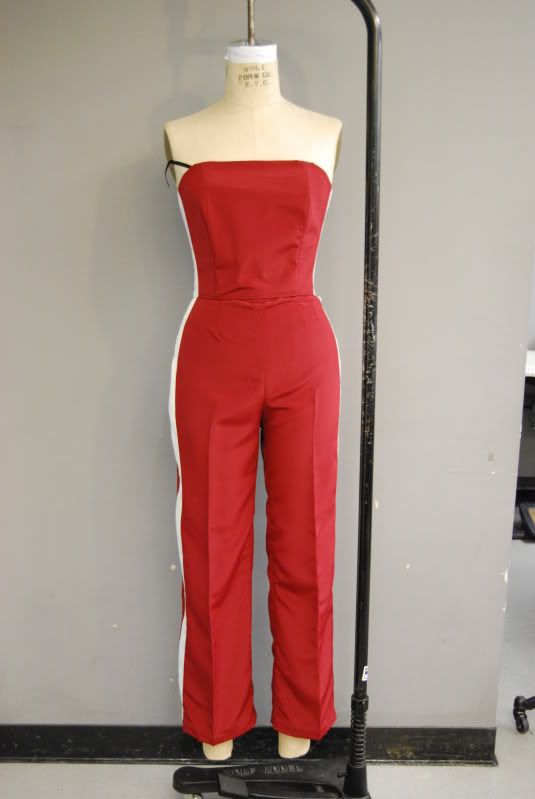
This picture comes out pretty darn RED but the colors are actually a pale cream brocade with a burgundy. The dummy used is a size 9, but the outfit is a size 8 so where things look a bit tight, that’s why. Considering this was also my very first pair of trousers that I’ve ever made, I’m pretty darn happy with them. The invisible zipper on the side came out really nicely, though I came up a bit short on the button extension. It all worked, but the extension looks a little crowded. I’m going to have to remember to apply the button extension process which is done on shirts for pretty much ALL button extensions. *refiling from -for shirts- to -for all buttons-*
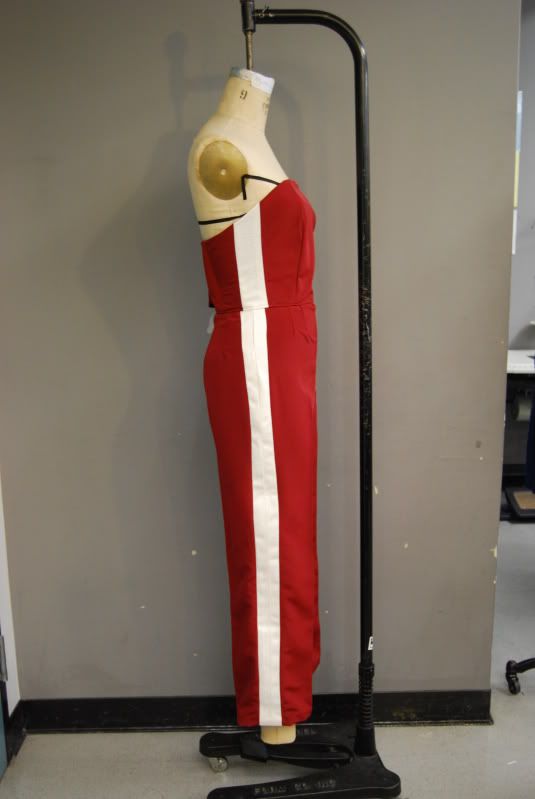
Here you can see the stripe down the entire length. I got it to match up reasonably well, but it’s not as precise as I’d like. I’m thinking that the reason for this is that I failed to double check that the trouser block waist line matched the bodice block waist. I know I’ve done that for the skirt, and things made from these blocks line up like a champ, but this is off just enough to make me suspect the block is to blame. *note to self: when doing patterns from different block pieces, make sure the joining sections MATCH*
Another thing I learned. I did the pants first, cutting a 1″ section off each exterior side of the legs to make the stripe with, then sewed the stripes together. Stupid. I ended up with a 2″ wide strip completely covered with another 2″ of seam allowance pressings on the inside, making the already heavier material just that much heavier. You can see the seam line down the center of the stipe on the pants, but not on the bodice.
OH! EARTHQUAKE. Right now. 6:12. Neat. Nothing major, but enough to feel. 4.4, centered in Westlake.
Anyway, by the time I got to the bodice I’d learned my lesson and combined the 2 sections into one. One of the reasons it didn’t cross my mind for the pants was that there is a curve on the outter edge of the pants and I didn’t immediately think of a way to combine the sections and still get the seam for the side zipper. Duh. Dart. So. Yeah. I need to stop and think ahead a bit more! sheesh. Once again, “careless error” is marked in red across my test. heh
As for the trouser hemline, this is much better than the hems I’ve done for the 3 dresses in the other class. Considering it’s my first attempt at a blind-hem, it’s passable but I’m not happy with it. Instead of a series of tiny dots, I ended up with a series of dashes of varying lengths. Since it’s readily visible, that rather defeats the purpose of a BLIND hem. Hems have always been my bane. In fact, the bottom edge of the bodice also sucked, in comparison to the rest of it. The teacher offered to work with me to show me various ways to hem and when to use which method.
Unlike for most of my projects, I sat down and filled out the entire pattern card before touching a single block piece. I mentally constructed the entire outfit, writing down all the pattern pieces that I would need and of what type/accessory — self, contrast, lining, boning, canvas, zipper, button. Doing all of this REALLY helped me focus not only on what I need to do, but also made the process of assembly amazingly painless. This entire outfit was put together in a 13 hour window, not including pattern making. And that window was not exactly working overly hard. I stuck to it, but I wandered around, spent some time unkinking my back, ate, etc. Had I been really pushing, I could have easily done it all in 10 hours. The only reason it went so smoothly is because I actually took the time and … pre-planned. *gasp* yes! ME! Can you imagine? I know. I know. It’s hard. I will definitely need to keep this lesson in mind, not only for projects I’m drafting up but for all projects. Mentally planning out what I’m going to do and how is big time saver. The only caveat is that if I’m not thinking about things as I plan them, I end with 2 1″ strips being sewn together to end up with a 2″ stripe. hehe. Only 2 sections gave me problems, the only 2 sections I did not adequately pre-flight: waistband, back closure.
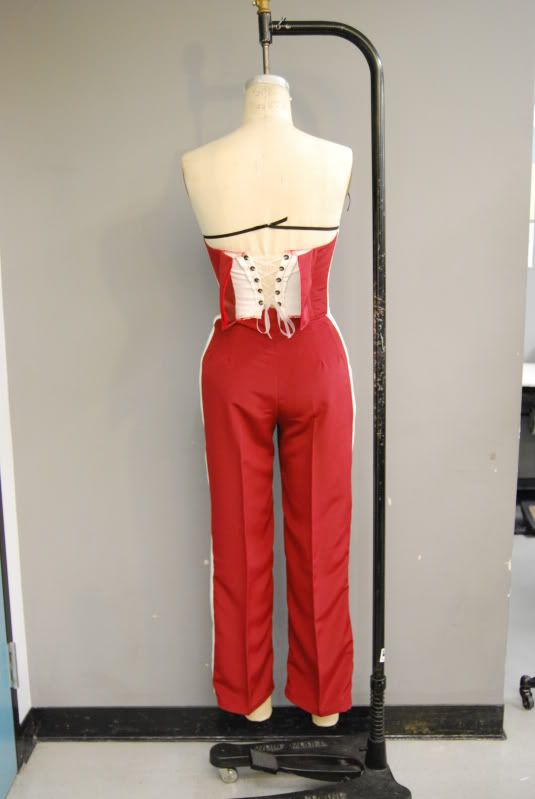
I had the photo taken here to show the underside of the bodice top. When the back is closed, this is invisible. As it was originally used, it’s a really good way to get a strapless empire-waist dress to stay up. This approach wasn’t particularly needed on THIS example, but it did afford me the opportunity to see how it worked. It’s also the only section of the entire outfit that I took the “let’s wing it” approach. It completely and utterly shows. The piece doesn’t line up, making me think I actually sewed them backwards thanks to my failure to transfer the pattern markings. I didn’t have enough grommets, being short by 1, to follow through with the original plan, so the settings are offset … not thinking ahead, I failed to count the grommet sets I had prior to marking and placing the first one. Only THEN did I decide to count and thus discover the problem. *shakes head* I swear. Will I EVER learn to be more methodical??
The problem with the waistband is another attempted “I’ll make that pattern on the fly” approach. Already covered it, just another hammer to the head that I should NOT do those “I’ll figure it out when I get there” sorts of things. *shakes finger sternly at self* They do NOT WORK for me!
The back itself is held closed with velcro. Yick. It’s double yick because I wasn’t sure how to put the velcro onto the top edge without having this heinouse seam line showing. I wanted the back to be pretty, not have a rectangle of stitches on the edge. As a result of attempting to attach the velcro strip gently, the piece slops around and doesn’t hold the garment well. In addition, I ran out of boning for use on those 2 edge pieces. While that was okay for the grommetted section because I triple turned it, the back ends did need that bit of stiffness.
Speaking of bones, I found a new type of boning at JoAnne’s. I know, every one hates JoAnne’s, but I swear I end up spending less by going there. Why? Because I’m not tempted into buying some gorgeous bit of fabric I have no use for or dramatically upgrade the material I was planning to use. Anyway, this boning is sew through! Obviously sooooo not something I’d use for a historical piece, or a serious corset, but for a simple bustier or a cheesy costume? Or a homework assignment? Hell YEAH! I plopped it down on the seams, and sewed straight through it into the seam allowance. It was easy and darn effective! I couldn’t be happier with it! The only part that it didn’t work really well on was the over-bust section. I apparently stitched it poorly because the right boob boning wants to twist, but that appears to be more “operator error” than any fault of the boning. The left boob looked just fine.
*thinks* I do believe that wraps up my post-mortem here. In short, I need more pre-planning more than anything. All my careless errors are due to trying to think on the fly or not thinking critically about something and just doing it instead.
Our next project is to make a kimono-sleeve jacket with a contrast material. I’m thinking I’m going to convert that into a Victorian-esque mantlette and FINALLY use up some of this black wool and faux black fur. Mainly, I’m looking for an excuse to play with soutouching. *LOL* I do hope I can find the camera battery charger before I have to turn it in. I’d like to be able to do a real post-mortem again. I find them to be immensely helpful.


Good notes and commentary. I like the idea of the ‘tux’ version of this…that could be *super* cute! *grin*